Getting started
Pick a hero, walk, fight and find your way in the first hour.
Ashenmoor is a dark action RPG in the Diablo tradition. You play one hero in a large, seamless world of five acts, fight through monsters for loot and levels, and follow the story from the town of Hollowmere out onto the moor.
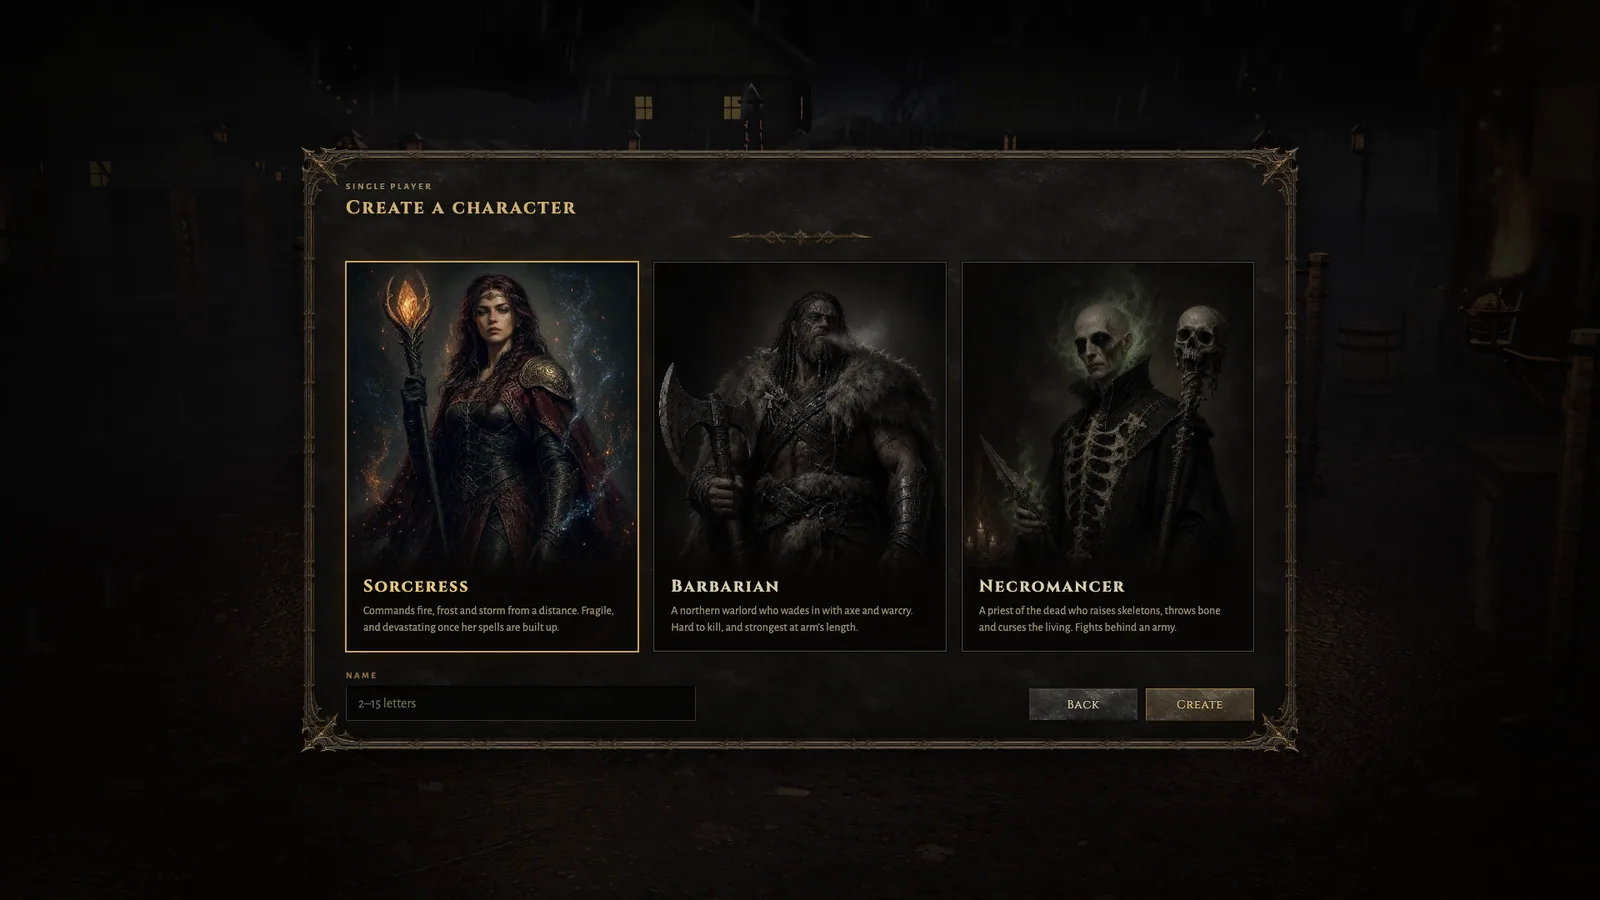
Choose a hero
- Sorceress: fire, frost and storm from a distance. Fragile early, devastating once her spells are built up.
- Barbarian: steel, war cries and fury at arm’s length. The easiest hero to keep alive.
- Necromancer: commands skeletons, throws bone and curses the living. Fights behind an army.
Pick Single Player to play in this browser, or Online to play with others on an account. Characters are separate in each: an offline hero stays in this browser.
Move and fight
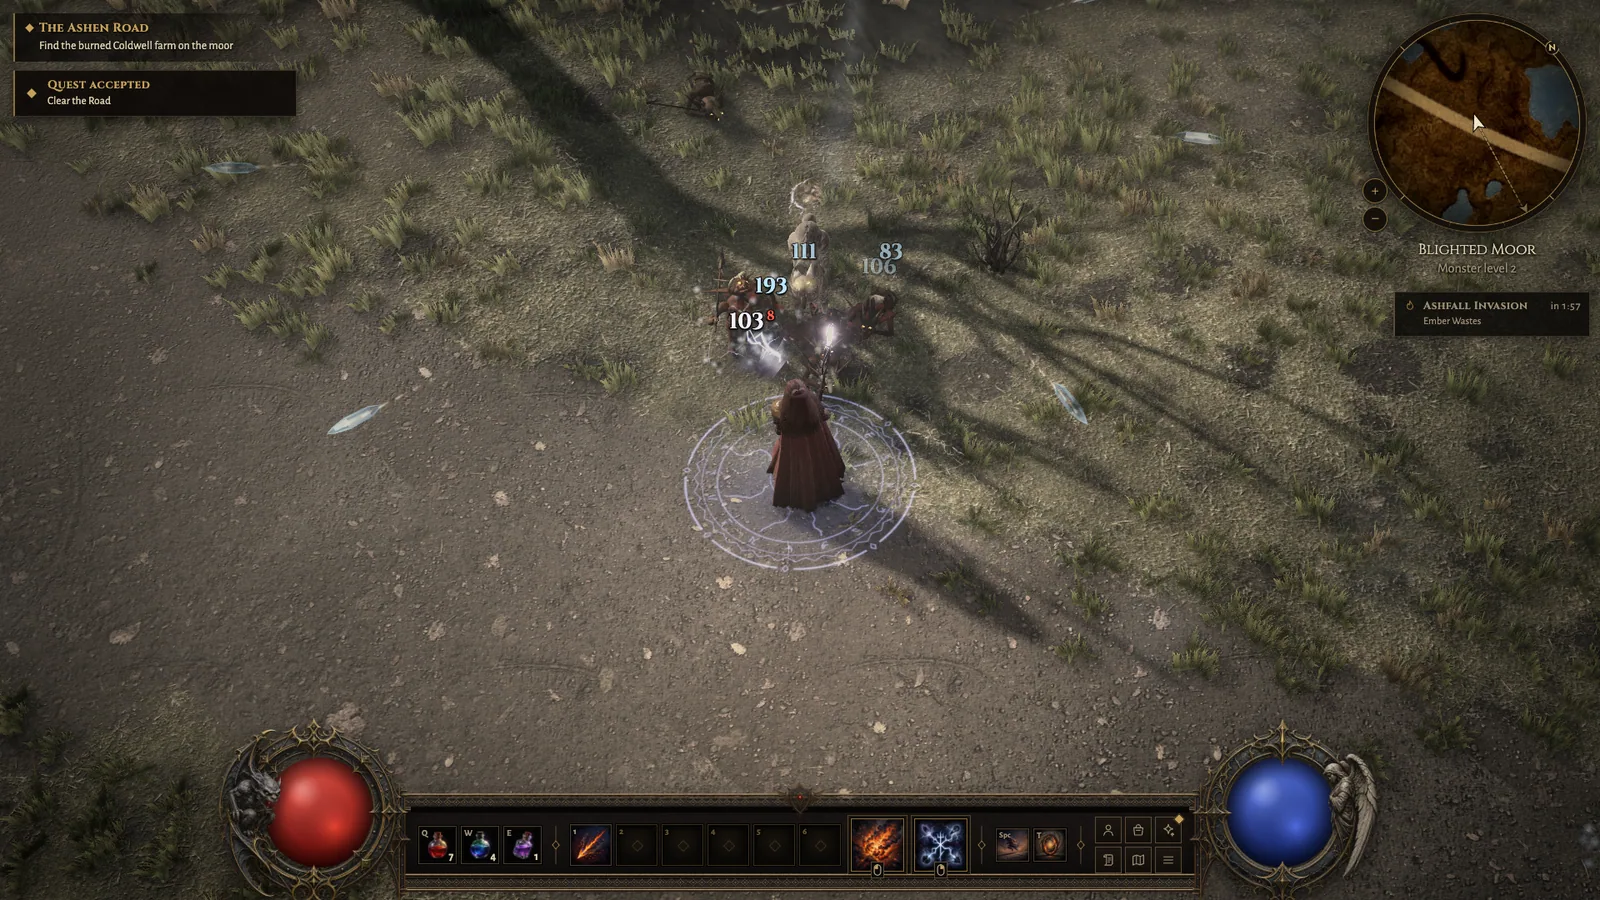
Drink a healing potion with Q before your life globe runs dry. Potions refill from drops and from Maera, the merchant in Hollowmere.
Your first steps
- Talk to Elder Oswin in Hollowmere: the gold ? over him says he is waiting for you. A gold ! over someone means the story needs them; a muted ! is side work.
- Follow the quest tracker at the top left of the screen. The star and route on the minimap, and on the map overlay (Tab), lead to the next step; F walks there for you.
- Touch the waypoint of each area you reach: waypoints let you travel back later.
- Spend your skill point on each level up in the Skills menu (S).
Short tips appear the first time something new happens: your first steps in town show Left mouse to move and strike, Right mouse to cast and Space to evade; the first time your life runs low the tip names Q and the potion slot flashes; your first drop suggests holding Alt; a level-up points to S for skills and C for attributes. Got it dismisses one; Turn off tips stops them, and Options, Gameplay turns them back on.
Controls
Every key and controller button, and how to change them.
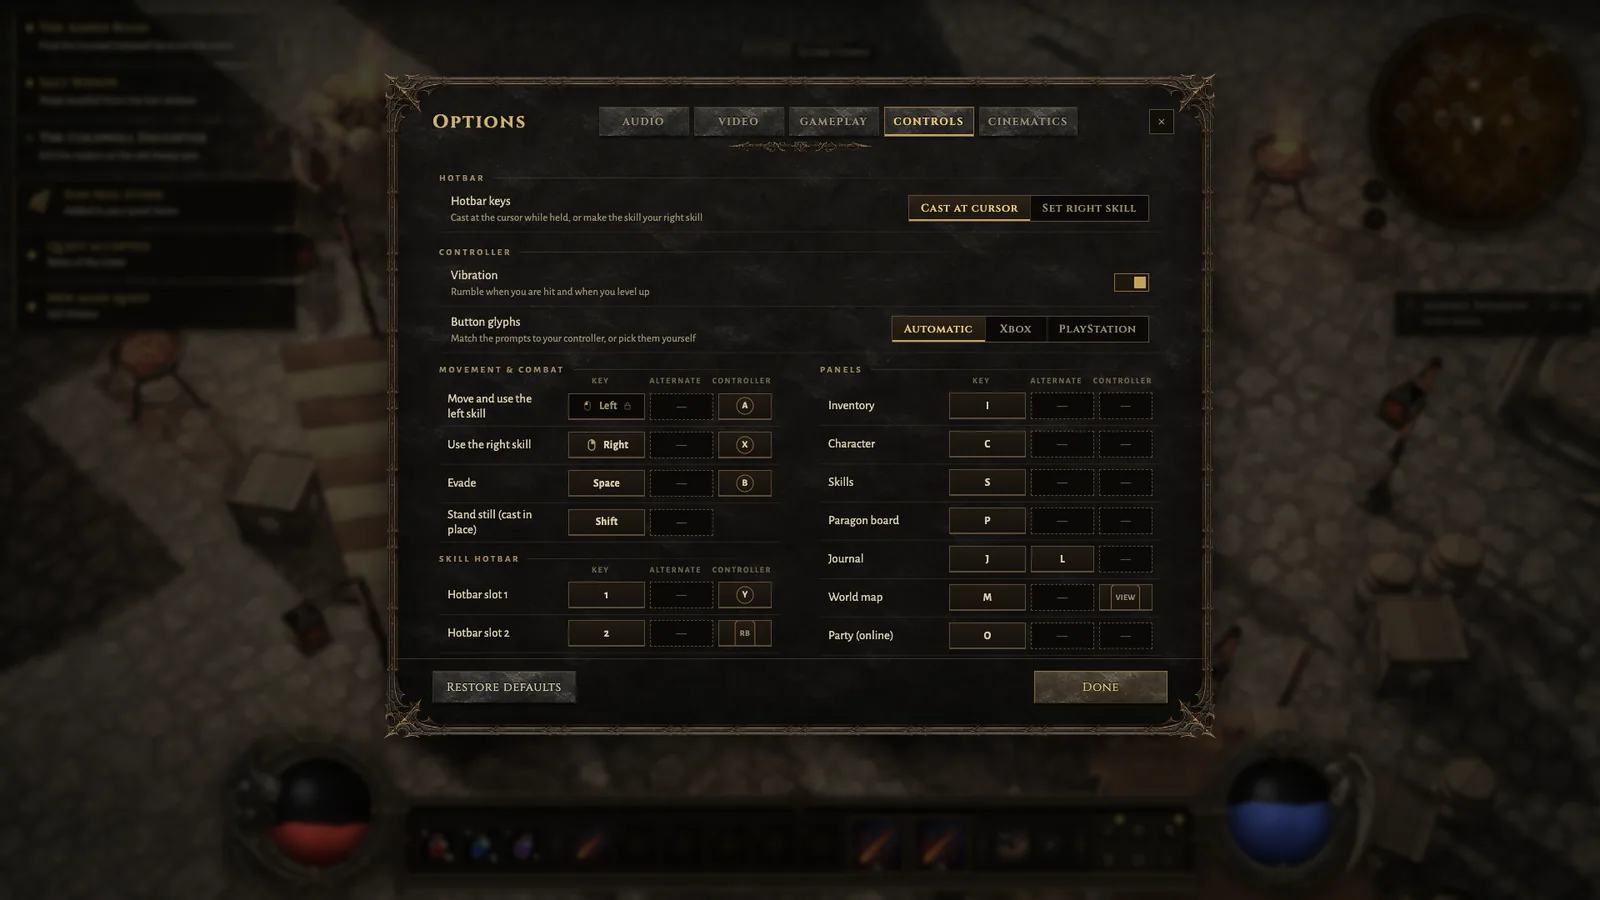
These are the default controls, the layout of Diablo IV on PC. Change any of them in the game in Options, Controls: click a binding and press the new key. A key that is already in use trades places with it.
In the gameOptions › Controls
Movement and combat
Skill hotbar
Potions and travel
Menus
C opens your attributes beside Skills. S opens the full skill tree; IB opens your inventory. Esc closes all open pages at once. In a confirmation or text field it cancels just that; with no pages open it opens the game menu.
Interface
Controller
Plug in any standard controller and press a button: the prompts switch to it, and back to the keyboard the moment you touch the mouse. The left stick moves, the right stick aims, and the game menu (Esc) holds the Inventory, Character, Skills, Journal and Map pages. In menus, A confirms, B goes back and the bumpers switch tabs.
Skills and respec
Learning skills, putting them on the bar, and taking points back.
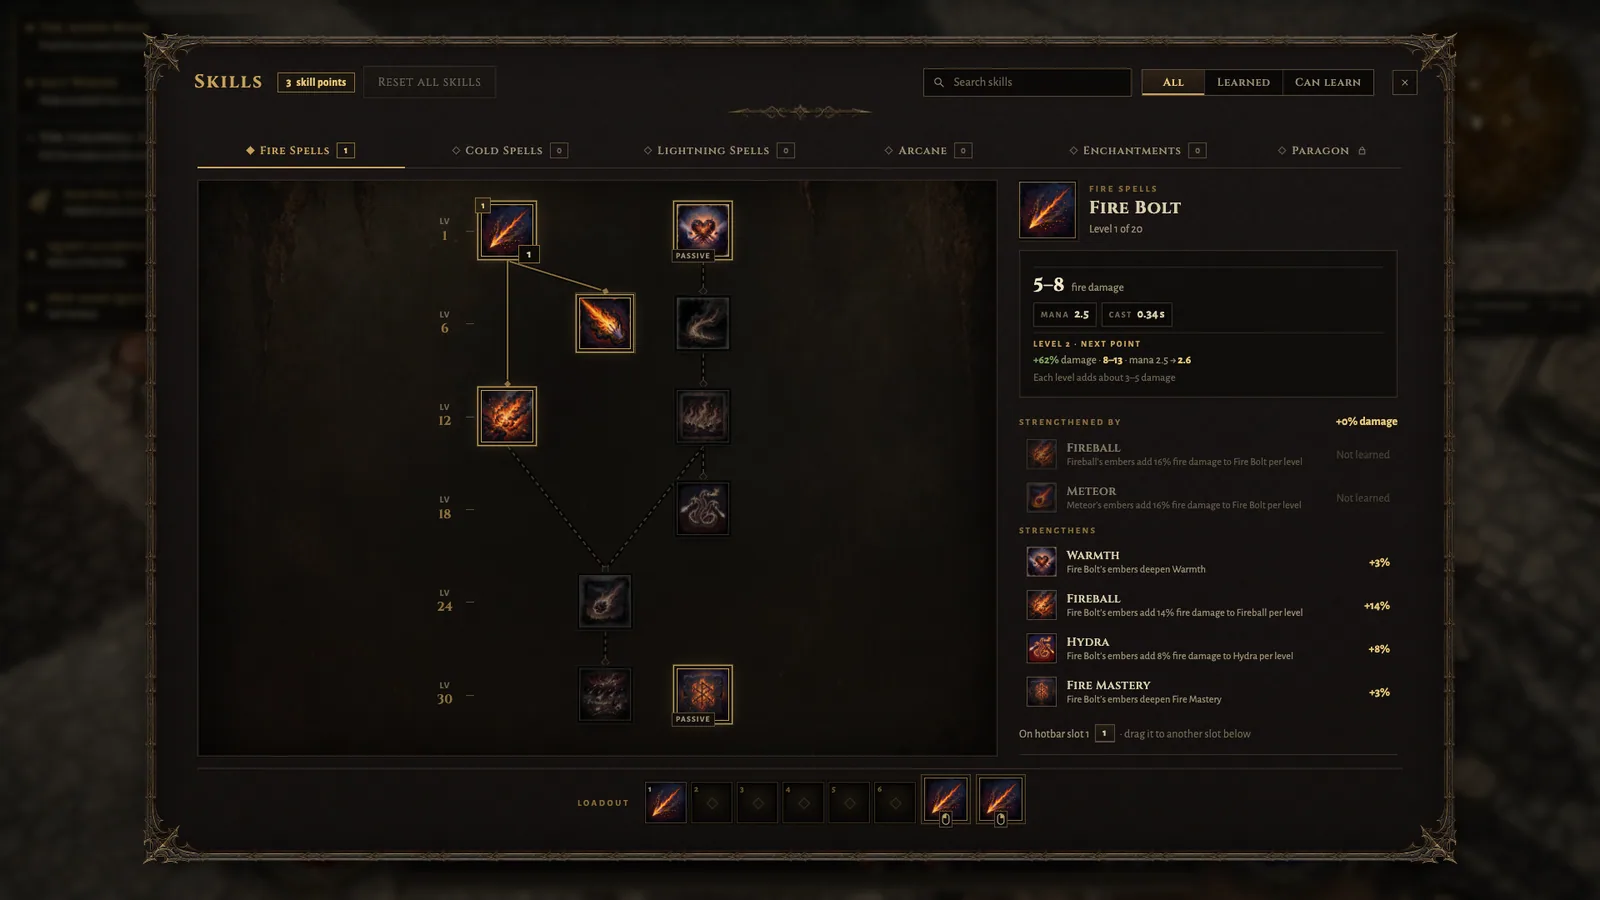
Every level gives you one skill point and five attribute points. Open the Skills menu with S: each hero has five trees, and rows further down open as you level.
Learning and taking points back
- Left-click a skill to put a point into it.
- Right-click a learned skill to take a point back and spend it elsewhere.
- To start over, Reset all in the Skills menu returns every point at once.
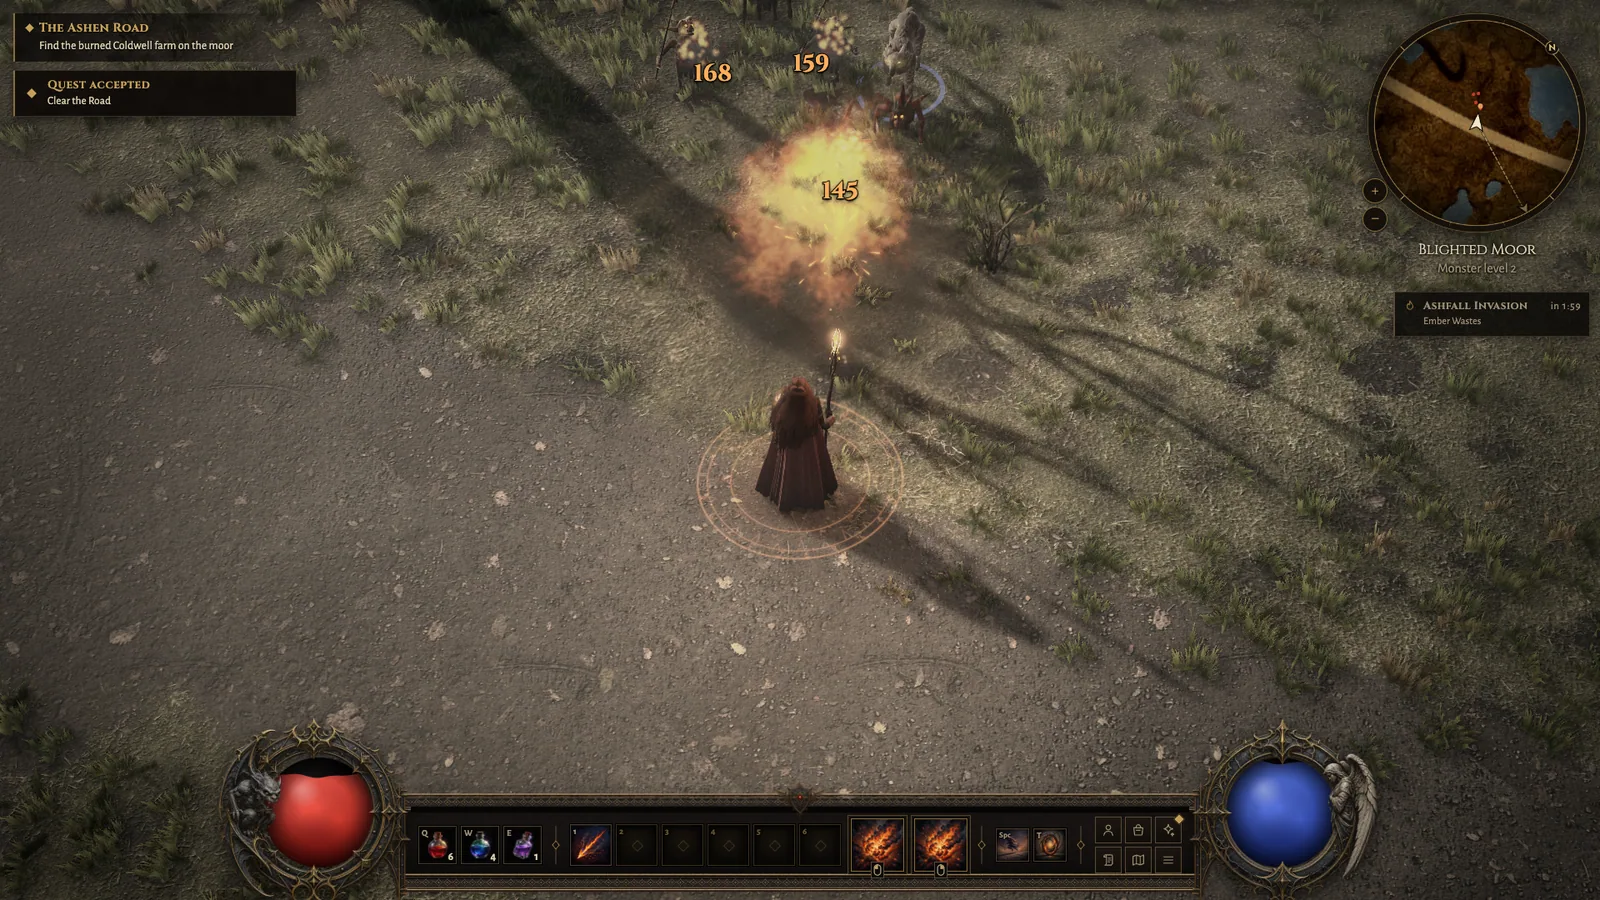
Every class casts with its own weight: the sorceress throws flame that bursts and clings, forked lightning and frost that rimes the ground; the barbarian’s Whirlwind tears up dust and turf and his Leap cracks the earth where he lands; the necromancer hurls barbed lances of bone, bursts corpses in a spray of gore and raises the dead clawing out of the soil.
From level 60 the Paragon tab (P) opens beside the trees: see Endgame. It takes points back the same way: right-click a claimed node, or Reset the board.
Putting skills on the bar
- Drag a skill from the tree onto any slot of the bar, the mouse buttons included.
- Or click a slot for a picker, or hover a skill and press a slot key (1 to 6).
- Drag one slot onto another to swap them; drag a skill off the bar to clear it.
Hotbar keys cast at the cursor while held. If you would rather have them choose your right skill, change Hotbar keys in Options, Controls.
In the gameOptions › Controls › Hotbar keys
Items, inventory and stash
Loot, comparing gear, stacks, selling and the shared stash.
Monsters drop gear, gems, potions and gold. Walk over or click an item to pick it up; hold Alt to show the name of everything on the ground, or press Z to keep the labels up. An upward arrow on a label marks an upgrade. Labels only name an item: pick it up to read it in full and compare it with what you wear, in your inventory, stash or a shop.
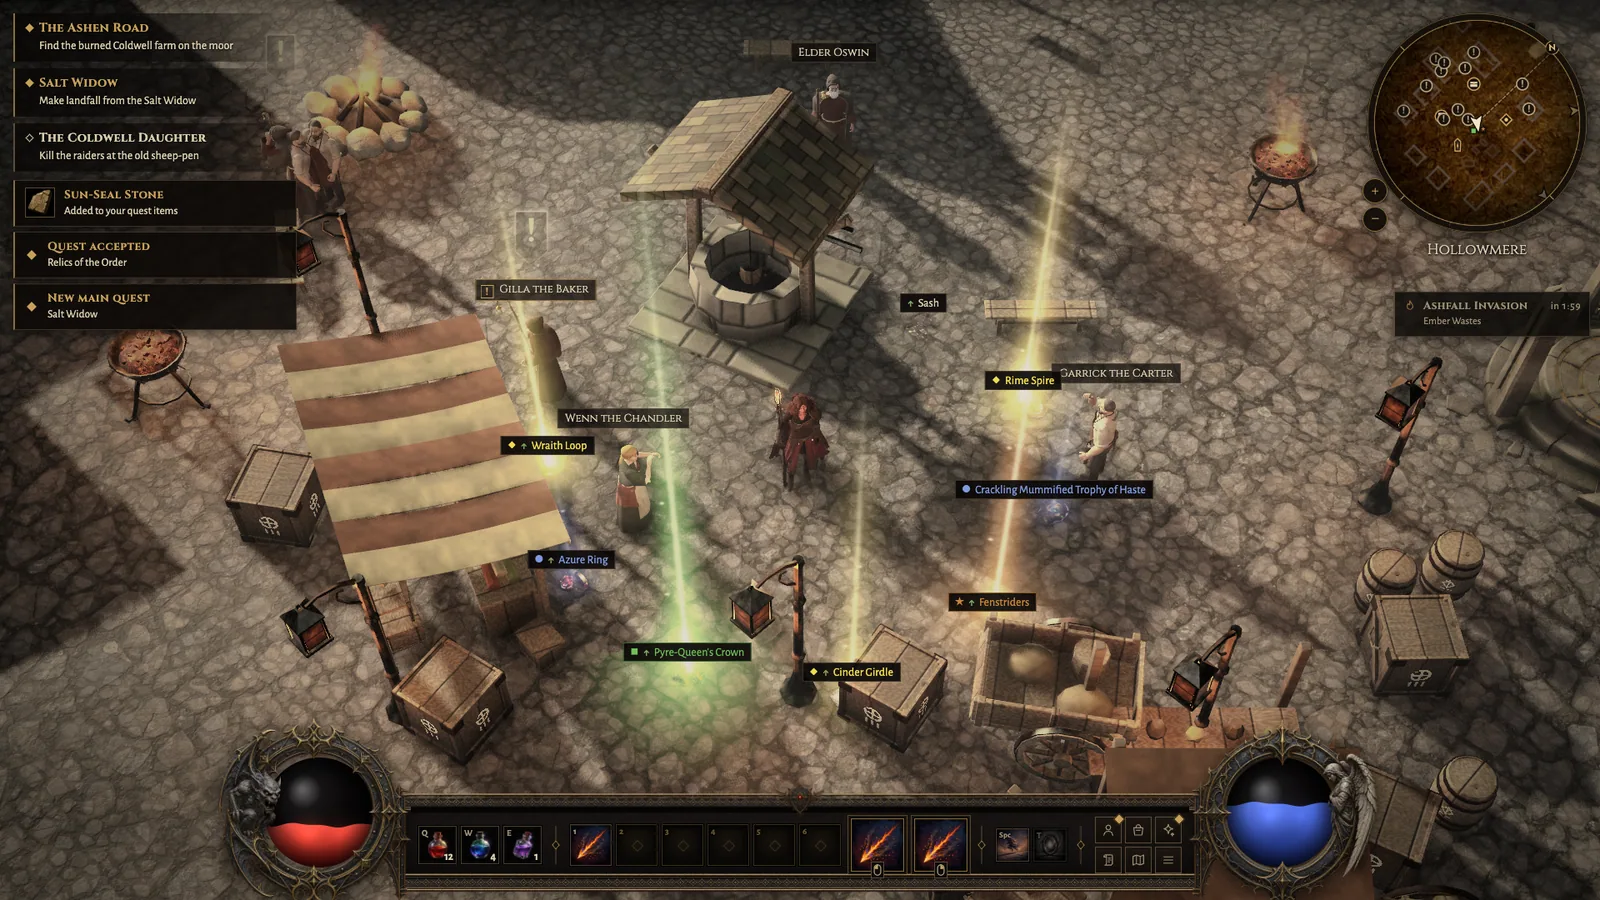
- Gold is picked up on its own when you pass within about four metres, and so are potions while your belt has room for them.
- Magic and better drops stand out with a beam of light; a set or unique item arrives with its own banner and sound.
- An item that fits an empty gear slot says so: right-click it to wear it.
Rarity
- Normal (white) and magic (blue): early gear and good to sell.
- Rare (yellow): three to five properties, the backbone of most builds.
- Set (green) and unique (gold): fixed, named items with their own powers.
Colour is never the only clue: every rarity also has a shape, on the ground label, in the corner of the item and in its tooltip. A circle is magic, a diamond rare, a square set and a star unique; a cross marks artifacts, a triangle gems, a ring gold and a pennant quest items.
With red-green colour blindness, turn on Colour-blind colours in Options, Gameplay: the rarities switch to colours that stay apart.
In the gameOptions › Gameplay › Colour-blind colours
The inventory
Open it with IB. The backpack has four tabs: Equipment, Gems and Artifacts, Consumables and Quest. Items go to their tab on pickup. An arrow on an item means it beats what you wear.
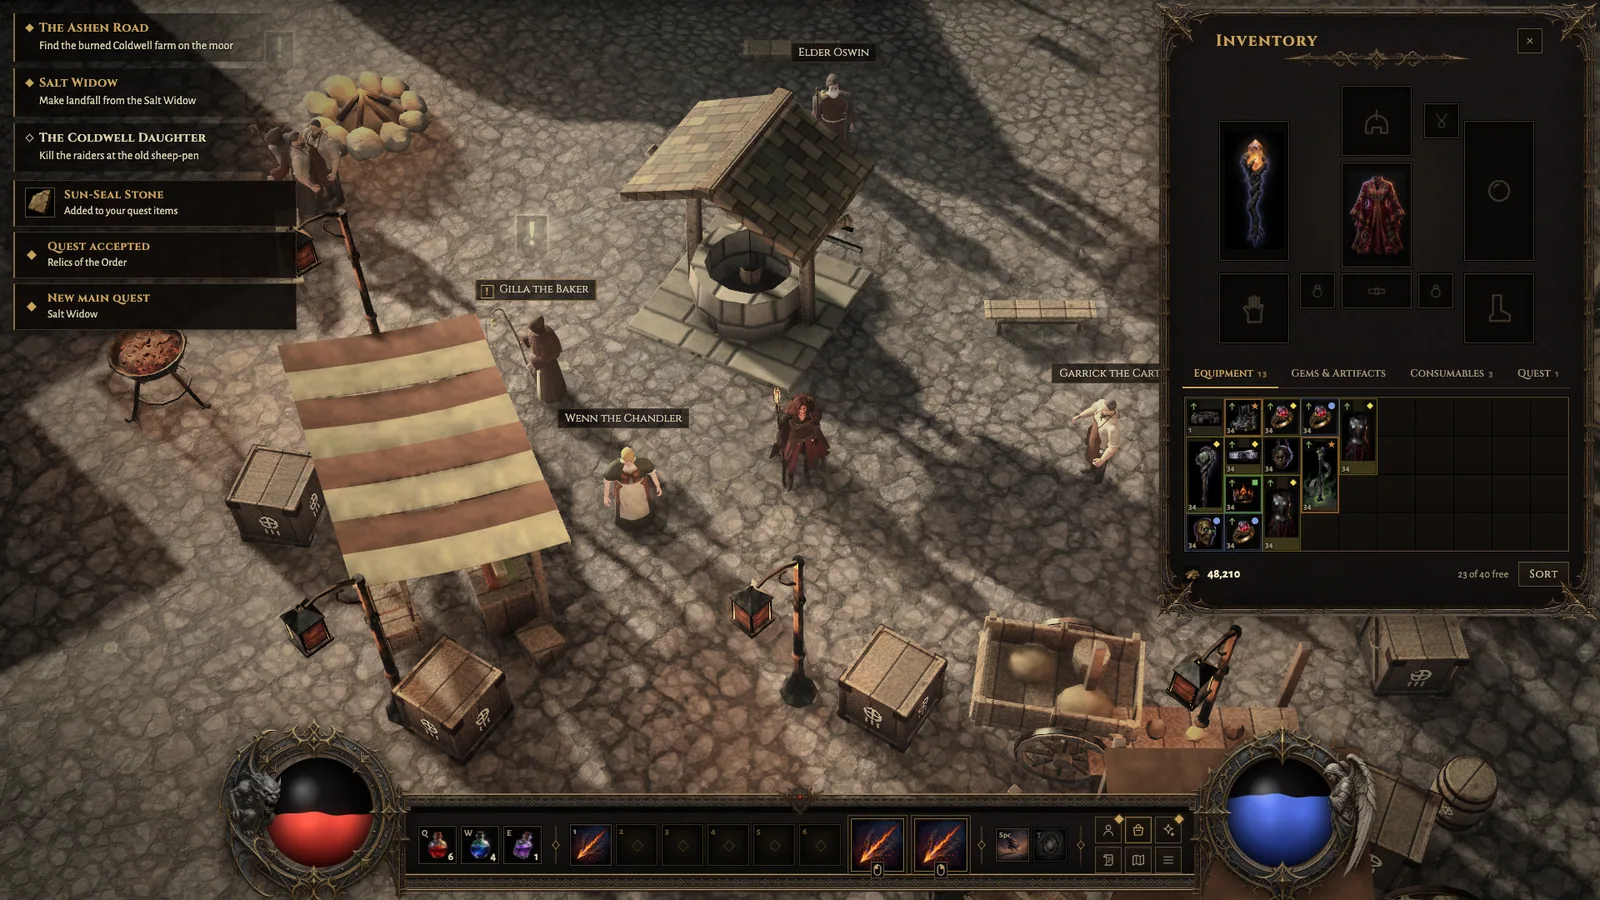
- Right-click equips, unequips, sells at a merchant or moves an item between the bag and the stash.
- Shift-click quick-moves an item. On a stack it splits off one piece.
- Ctrl-click locks an item, so it can never be sold or quick-moved by accident.
- Gems of the same type and grade, potions and seals stack to 50. Drop a stack on its kind to merge them.
- Hold Shift over an item to hide the comparison.
The stash
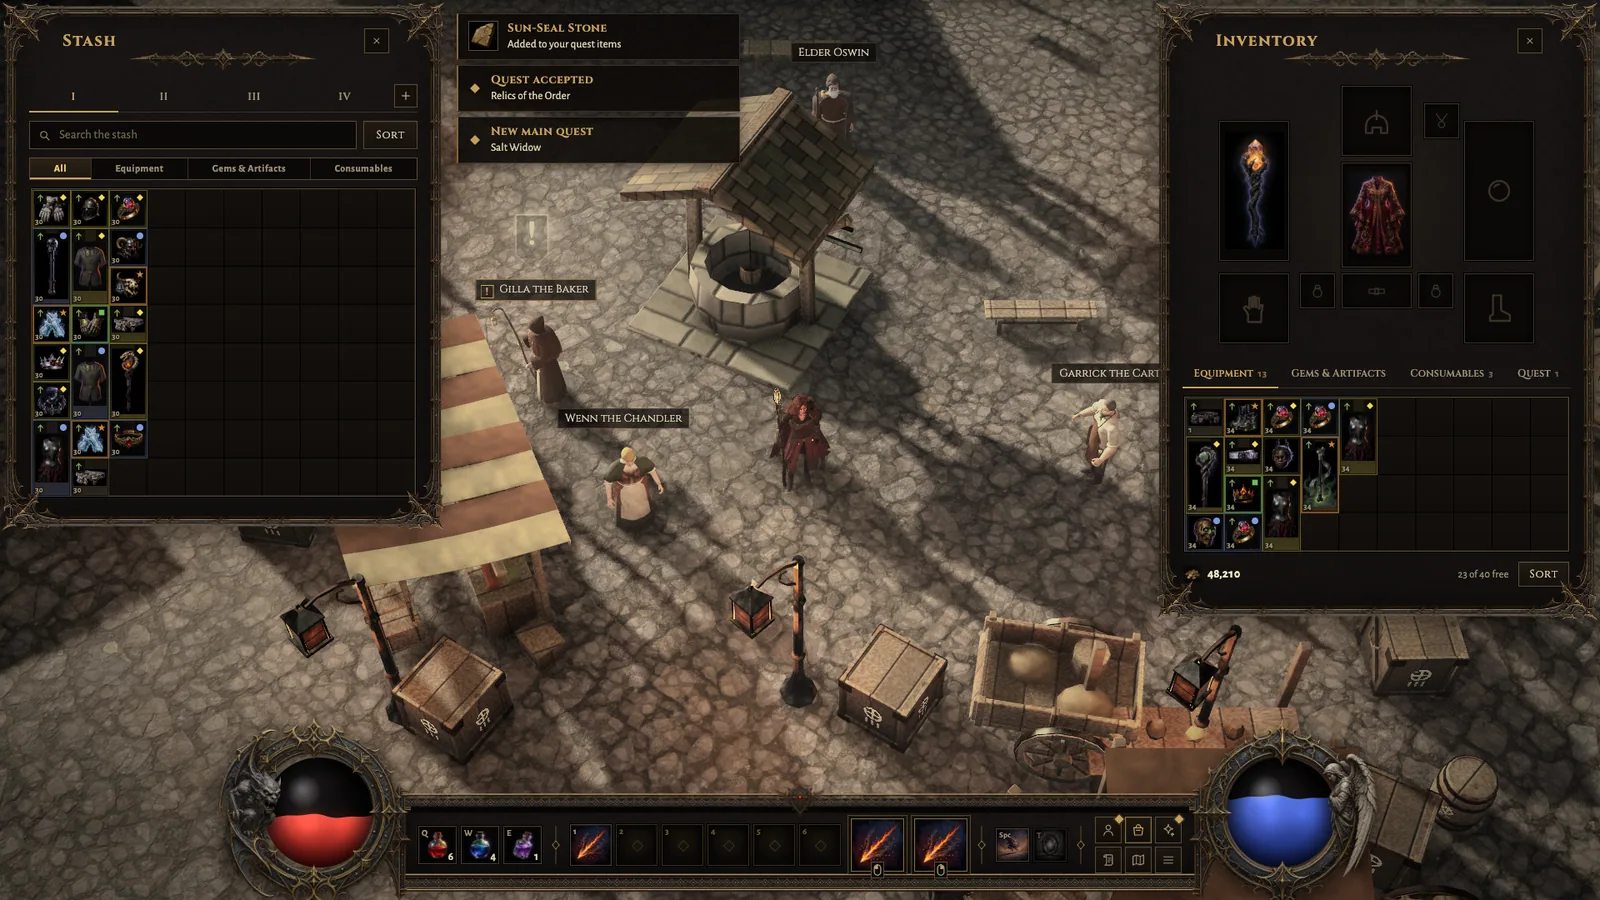
Every town has a stash chest; its lid swings open while you use it. They all open the same shared stash, which every character on your account (or in this browser, offline) can reach. Each tab holds 10 by 8; four tabs are free and up to eight more can be bought with gold. Tabs can be renamed, sorted, searched and filtered.
The stash, merchants, the smith, waypoints and anyone you talk to close their window when you walk away from them. The inventory that opened beside the stash or a shop closes with it; if you had the inventory open already, it stays. Character and skills stay open until you close them.
Merchants
- Sell junk sells every unlocked normal and magic piece at once. Lock anything you want to keep first.
- Sold something by mistake? The last 12 things you sold wait under Buyback at the merchant for the rest of your visit, at the price you got.
- Buy to full fills that potion slot of your belt in one go, and shows the total price first.
Quests and the story
Following the story: quest marks, the tracker and the journal.
The story runs through five acts. Each act has main quests that move it on and side quests for people you meet.
Who to talk to
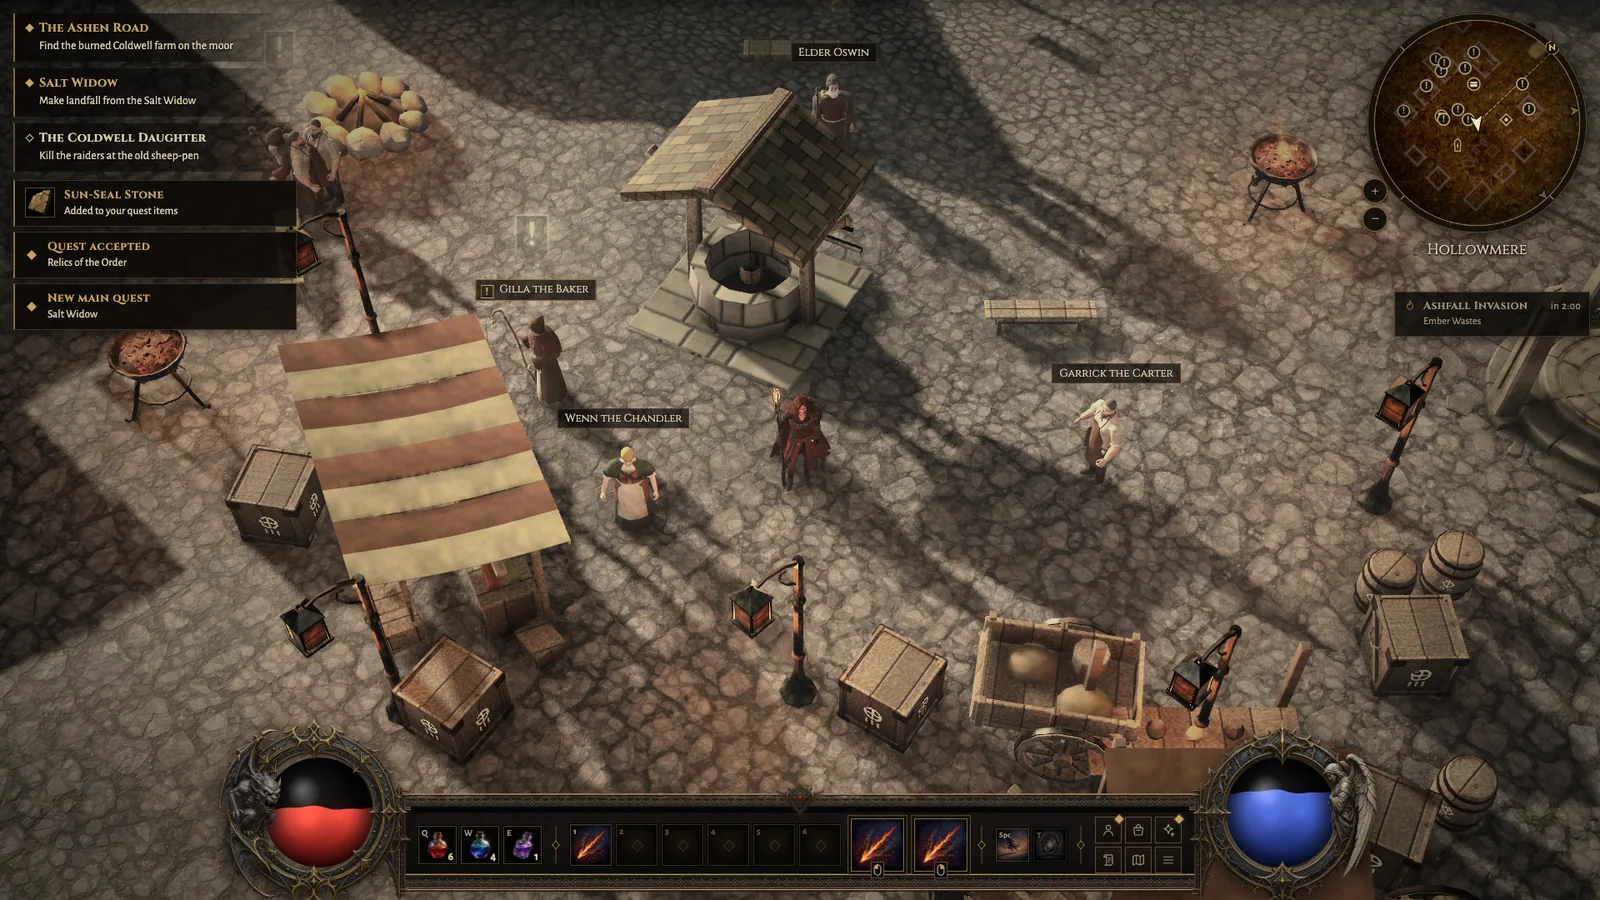
Ghostly banners float over people with something for you, and show through fog from far off:
- A gold !: the story needs them.
- A muted !: side work.
- A ?: a quest is ready to hand in, or someone you were sent to talk to.
Story people also turn and step towards you as you come near. Indoors you only see the banners of people in the same building, and there are none in dungeons. To hide them, turn off Quest marks over people in Options, Gameplay.
In the gameOptions › Gameplay › Quest marks over people
The tracker
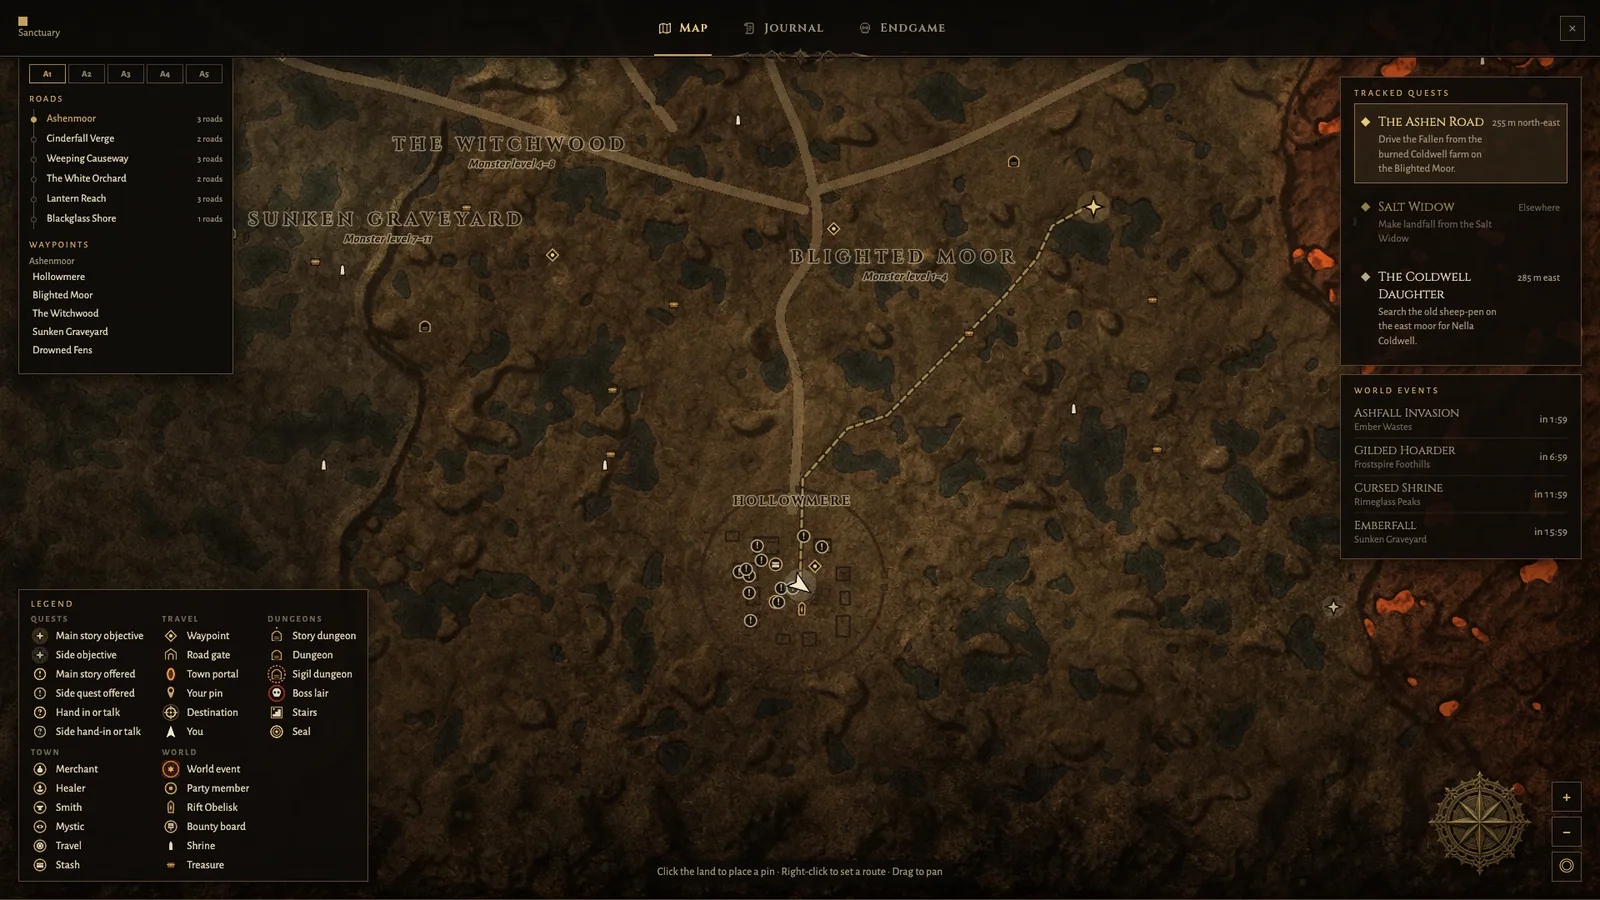
The quests you follow are listed at the top left of the screen, with the next step for each. Click one to open the map on its objective. A star on the minimap points to it, and when it is far away the route on the minimap and map overlay shows the way; F walks it for you.
The journal
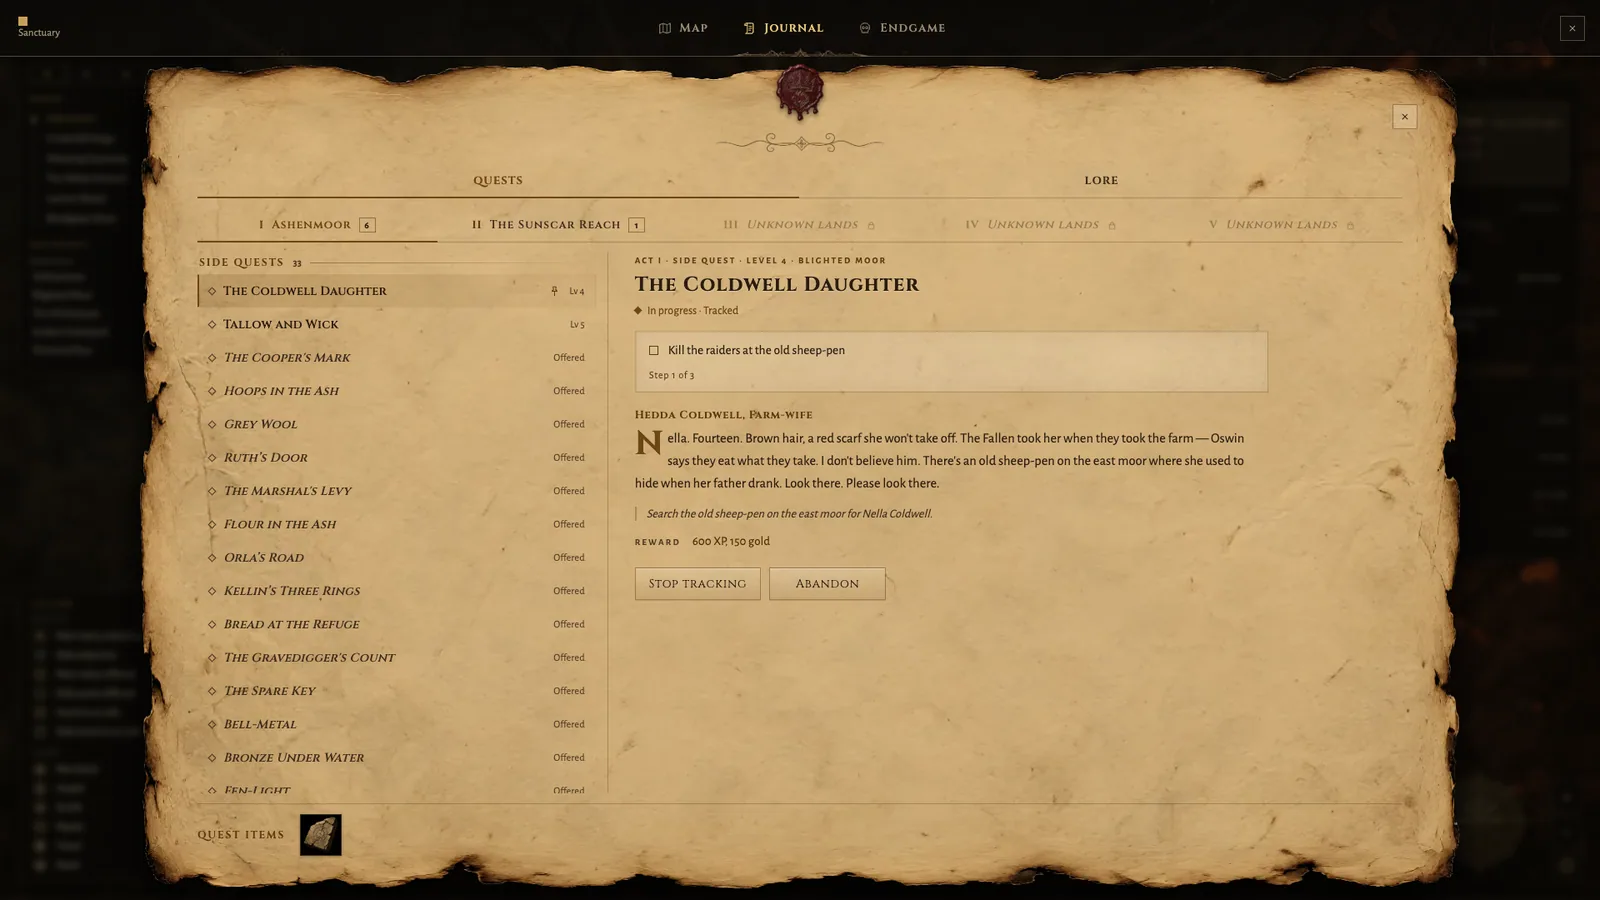
Open the journal with JL. It lists every quest by act, main and side, with the story so far, the items you have gathered and the lore writings you have found. Choose which quests to track from here.
In the gamethe journal
Map, pins, routes and waypoints
Reading the map, pins, routes with auto-walk, and fast travel.
Open the world map with M, or lay it over the ground with Tab. The map fills in as you explore, and its legend explains every icon.
Pins
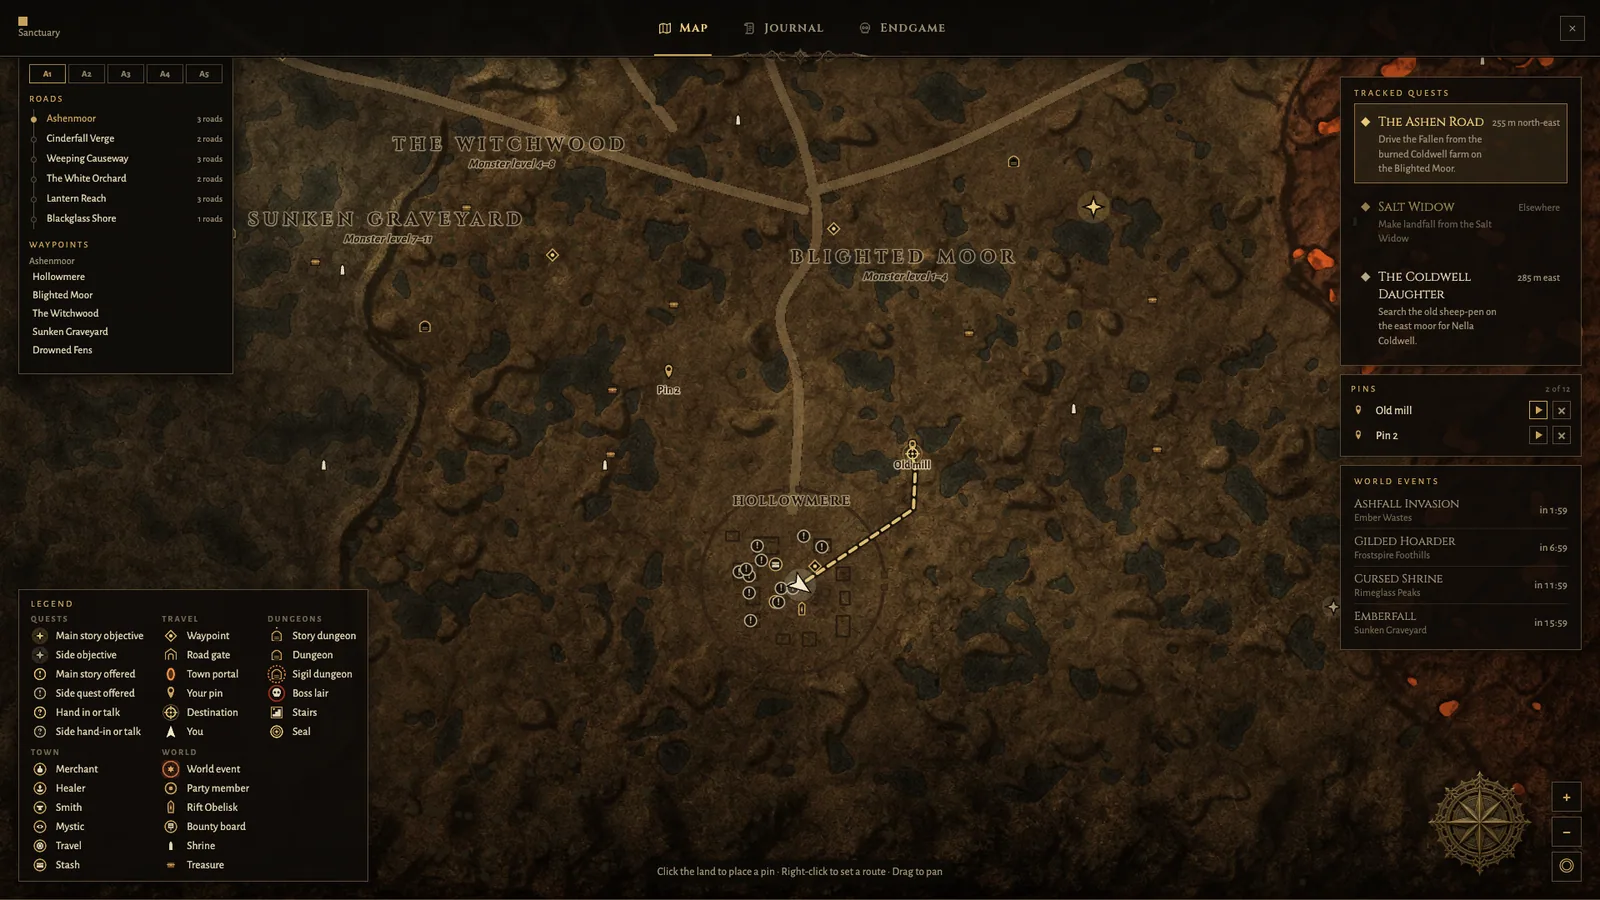
- Click open ground on the world map to drop a pin; right-click a pin to remove it. Each map holds up to 12.
- Pins are listed beside the map with their distance. Rename one in place, route to it, or remove it from the list.
Routes and auto-walk
- Right-click the minimap or the world map to set a destination. The quickest walkable way is drawn on the minimap, the world map and the map overlay (Tab). Nothing is drawn on the ground itself, so the view stays clear.
- A card under the minimap shows where you are going and how far. Press F to walk it on your own and again to stop; any order you give takes over meanwhile.
- The route clears when you arrive, die or change map. Esc clears it sooner, and right-clicking the destination on the map removes it.
- With no route set, F walks the road to your tracked quest.
Waypoints
Waypoints are raised stone platforms with a soft rune light. Walk onto one to discover it (the game saves as you do). Standing on any waypoint, choose another one you have found to travel there at once, across acts too.
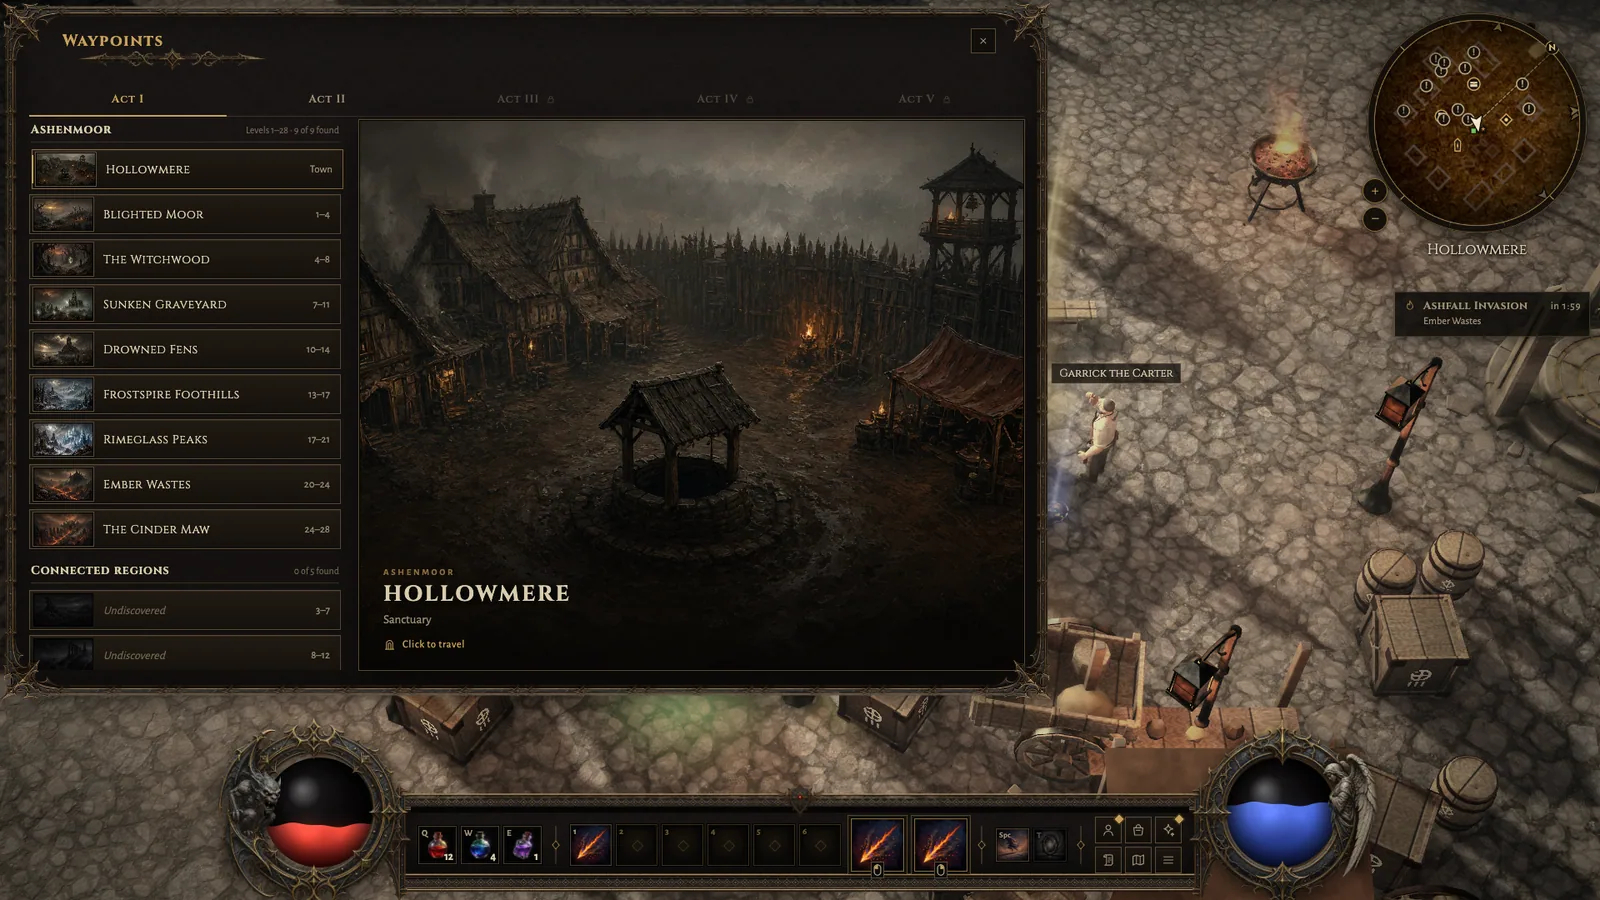
The minimap
The minimap sits at the top right, a little larger on big screens. Zoom it with = and - or the mouse wheel over it; click it to open the world map, right-click it to set a route. Its icons (healer, merchant, waypoint, rift, bounty board, stairs, seals, your pins) are explained in the map’s legend. It can turn with the view or keep north at the top.
In the gameOptions › Gameplay › Minimap orientation
Town portal, evade and death
Getting out of trouble, back to town, and what happens when you fall.
Town portal
Press T to open a town portal. Every hero can: no scroll needed. It takes a short channel (under two seconds), and moving, casting, evading or being struck breaks it, so step out of the fight first. The portal in town brings you back to where you left. It has a 5 second cooldown.
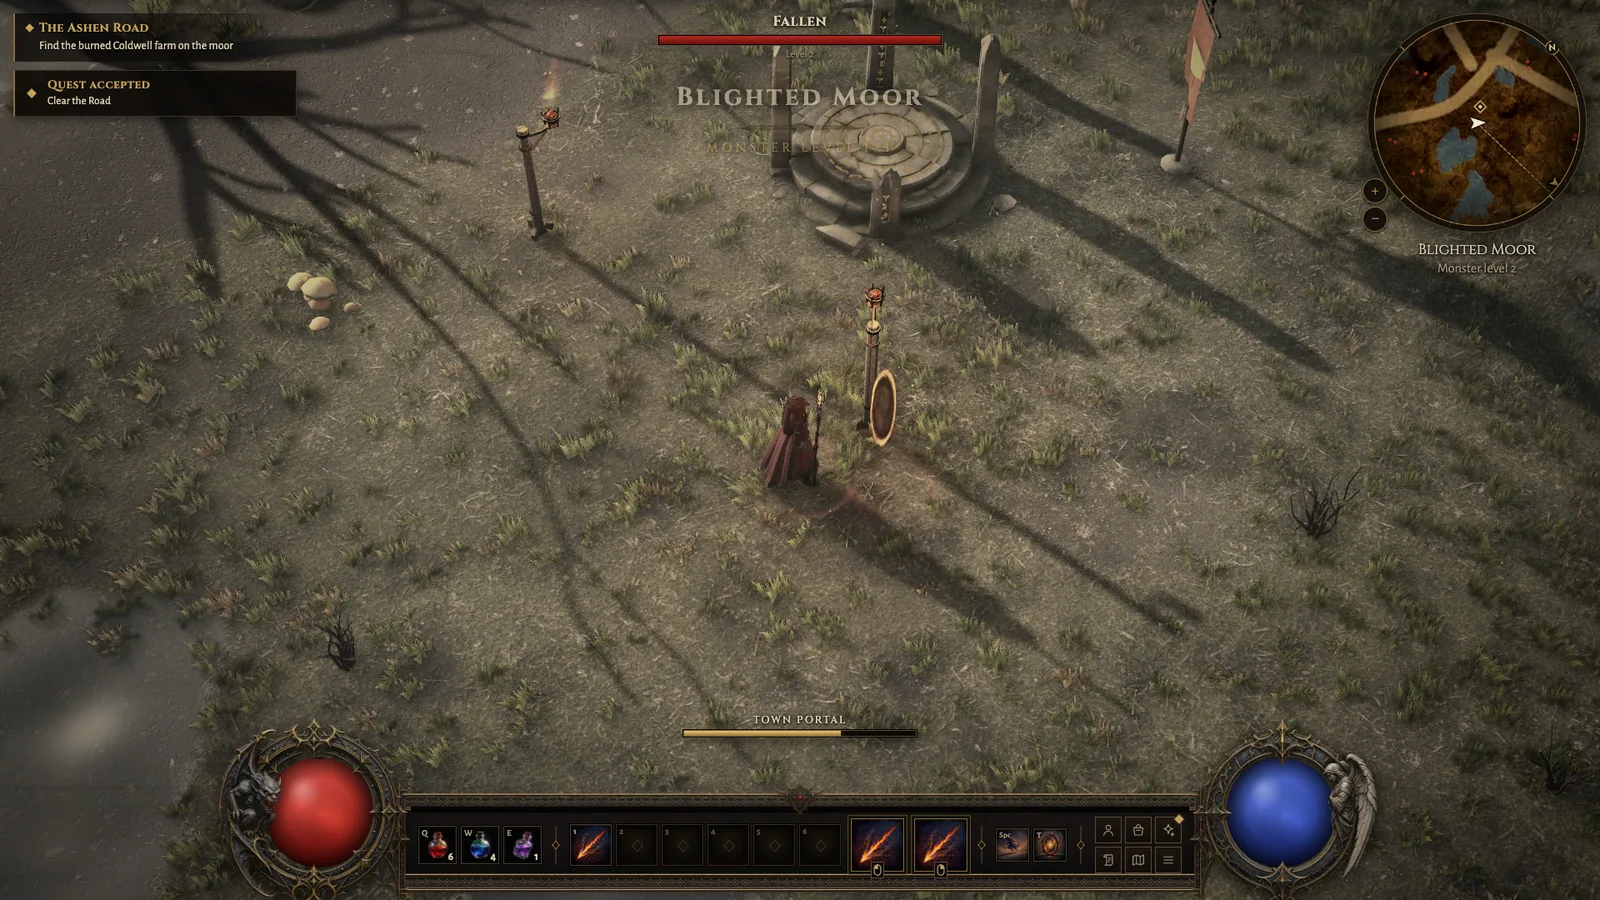
Evade
Press Space to dash a few metres towards the cursor. Nothing can hit you during the dash, so use it through a boss’s big swing or out of a ring of fire. It has a 5 second cooldown, shown on the skill bar.
Death
When you fall you wake in town (or at a nearby waypoint in a few far regions) and lose a tenth of the gold you carry; your gear stays with you. A hardcore hero is different: death is permanent (see Ladder, hardcore and seasons).
Monsters return
A pack you clear on the open moor comes back after three to five minutes, out of sight and never on top of you, and it may return stronger, as champions or an elite. Dungeons stay cleared.
Online, lobby and parties
Accounts, the Realm and named games, chat, names and parties.
Your account
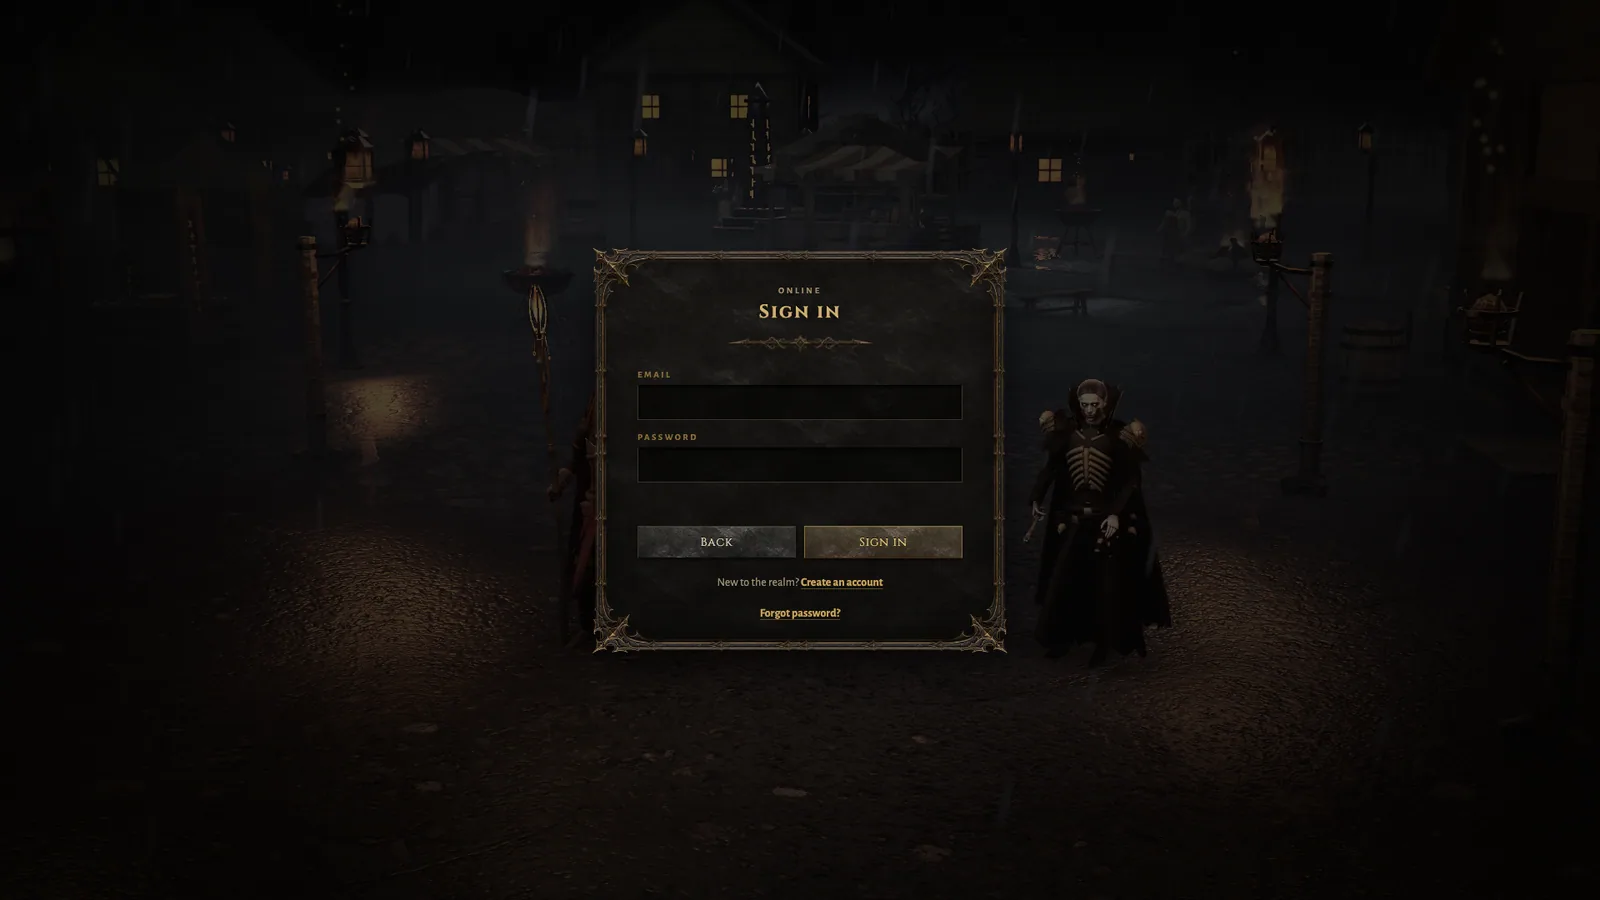
Choose Online on the title screen and sign in with your email and a password of at least 8 characters. A verification email secures the account and lets you reset a forgotten password (Forgot password? on the sign-in screen). Online characters are saved on the server and play on any computer.
The Realm and named games
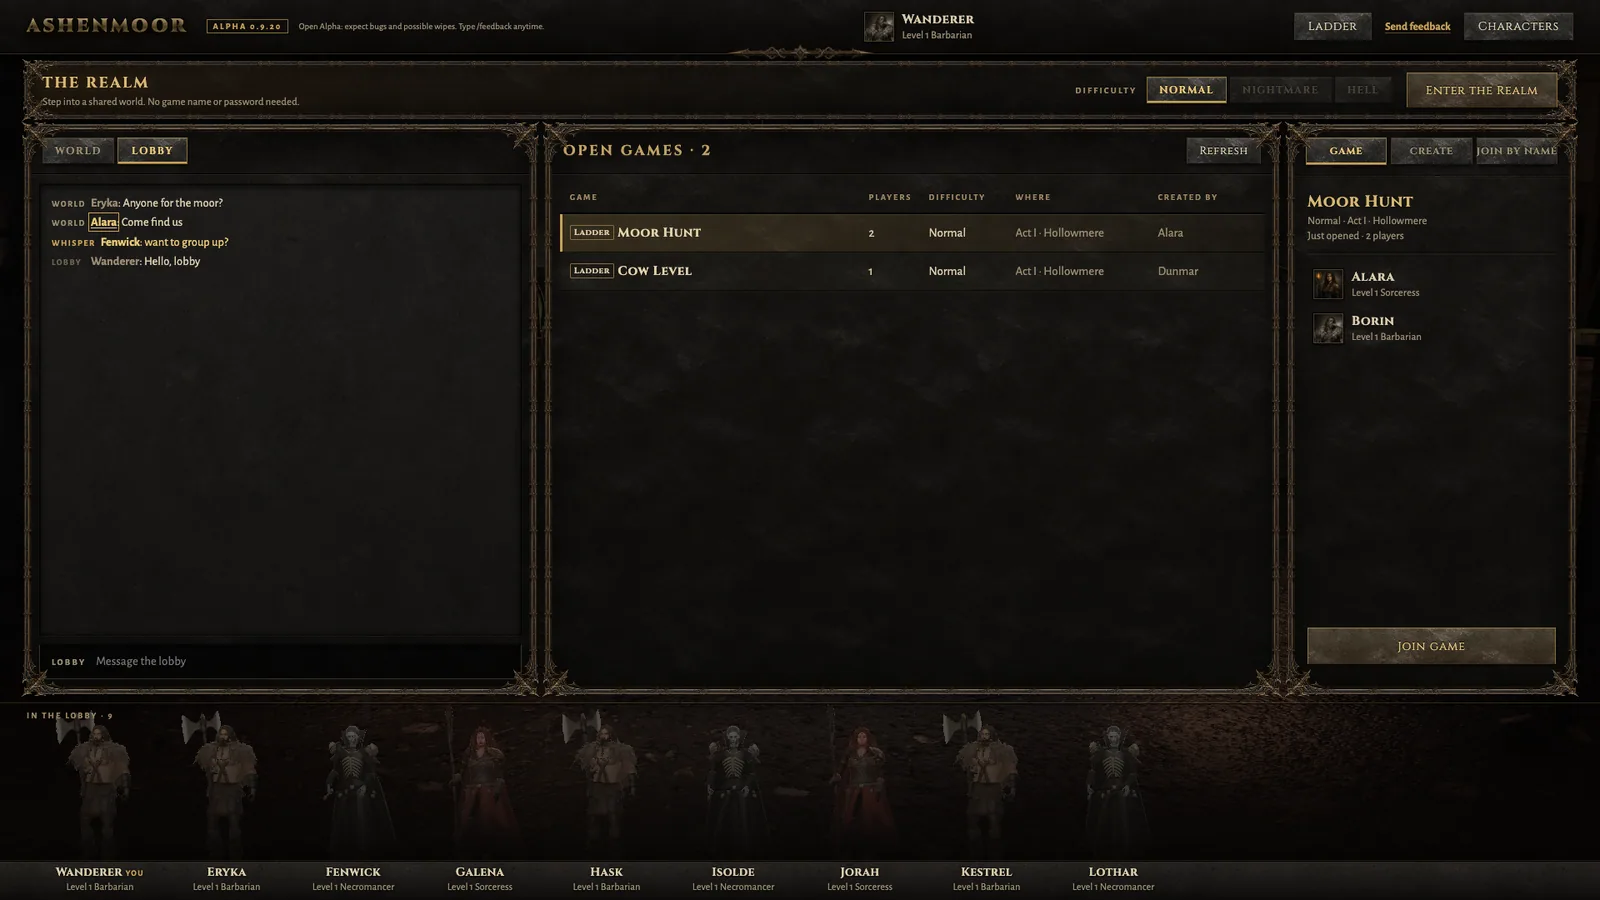
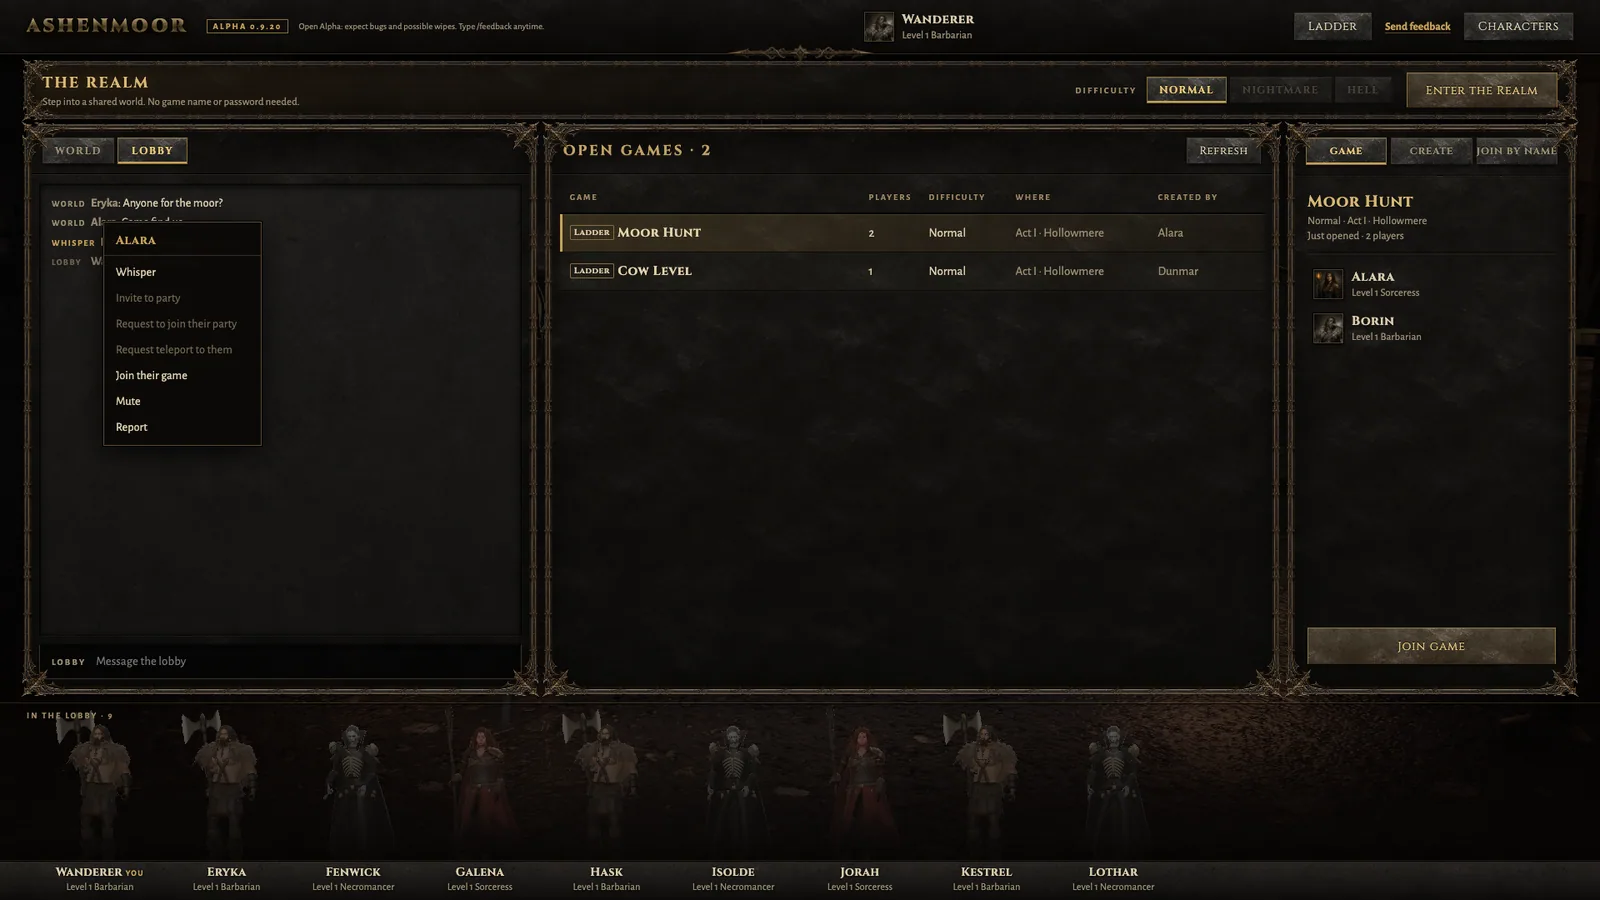
After choosing a character you arrive in the lobby: chat on the left, the open games in the middle, and everyone waiting along the bottom.
- The Realm is the quick way in: pick a difficulty your hero has opened and choose Enter the Realm. It is one shared world per difficulty (and per ladder and hardcore mode) that never closes, with no game name or password and no player limit. You start where you last saved.
- Named games are your own: Create one with a name and a difficulty, or add a password to keep it private (private games are not listed; friends use Join by name). Double-click a listed game to join it. There is no player limit per game.
- The game menu’s Leave the Realm or Leave game brings you back to the lobby.
- If the servers are full the lobby says so; try again in a few minutes. When the list of named games is full, the Realm is still open.
Chat and names
Press Enter to talk. There are World, Game and Party channels (and Lobby in the lobby); Tab switches between them.
/w name messagewhispers one player;/ptalks to your party and/worldto everyone.- Click or right-click a name, in chat, the lineup or the player list, for Whisper, Invite to party, Request to join their party, Request teleport to them, Join their game (in the lobby), Mute and Report (which sends us their recent lines). Choices that do not apply right now are greyed out, and say why on hover.
Parties
- Every party request asks first: an invite, a request to join and a request to teleport each show a card to the other player with Accept and Decline. It waits 30 seconds.
- A teleport puts you beside a party member in the same game and act, if you have opened that place yourself.
- Your party’s portraits, levels and life bars sit at the top of the screen.
- Open the Party page with O to see who is in your game, invite them, request a teleport, or turn hostile to fight other players (and risk a share of your gold).
Joining a game never puts you in someone’s party by itself: ask, or invite.
Feedback, from anywhere: see Alpha notes and feedback.
Ladder, hardcore and seasons
Competing in a season, and heroes who only live once.
When you create an online character you choose its modes, and they cannot be changed afterwards:
- Ladder (on by default): the hero competes in the current season. When the season ends, ladder heroes move to non-ladder with everything they carry.
- Hardcore: death is permanent. A fallen hardcore hero can never be played again; it stays on the ladder, marked Fallen, as a record of how far it came.
Heroes of each mode play with their own kind: ladder with ladder, hardcore with hardcore. Chat is shared by everyone.
The ladder
The Ladder button in the lobby (and on the online character list) shows the rankings: pick the season, softcore or hardcore, a class, and ladder or non-ladder. The first hero to reach levels 10, 20, 30, 40 and 50 each season is named at the top. The same rankings are on the web at playashenmoor.com/ladder/.
Seasons end when we announce it, not on a fixed date. The first one is Alpha Season I.
Endgame
Paragon, Ashen Tiers, the Pit, sigils, bounties, Emberfall and Starfall Focus.
After the story, the world opens again: harder difficulties, a board of permanent power and a rotation of activities. The Endgame tab of the map screen gathers them all: each hunt with what opens it, and a button that enters it or draws the road to where it starts. Jorund Vale, the caravan-master in town, takes you to each one.
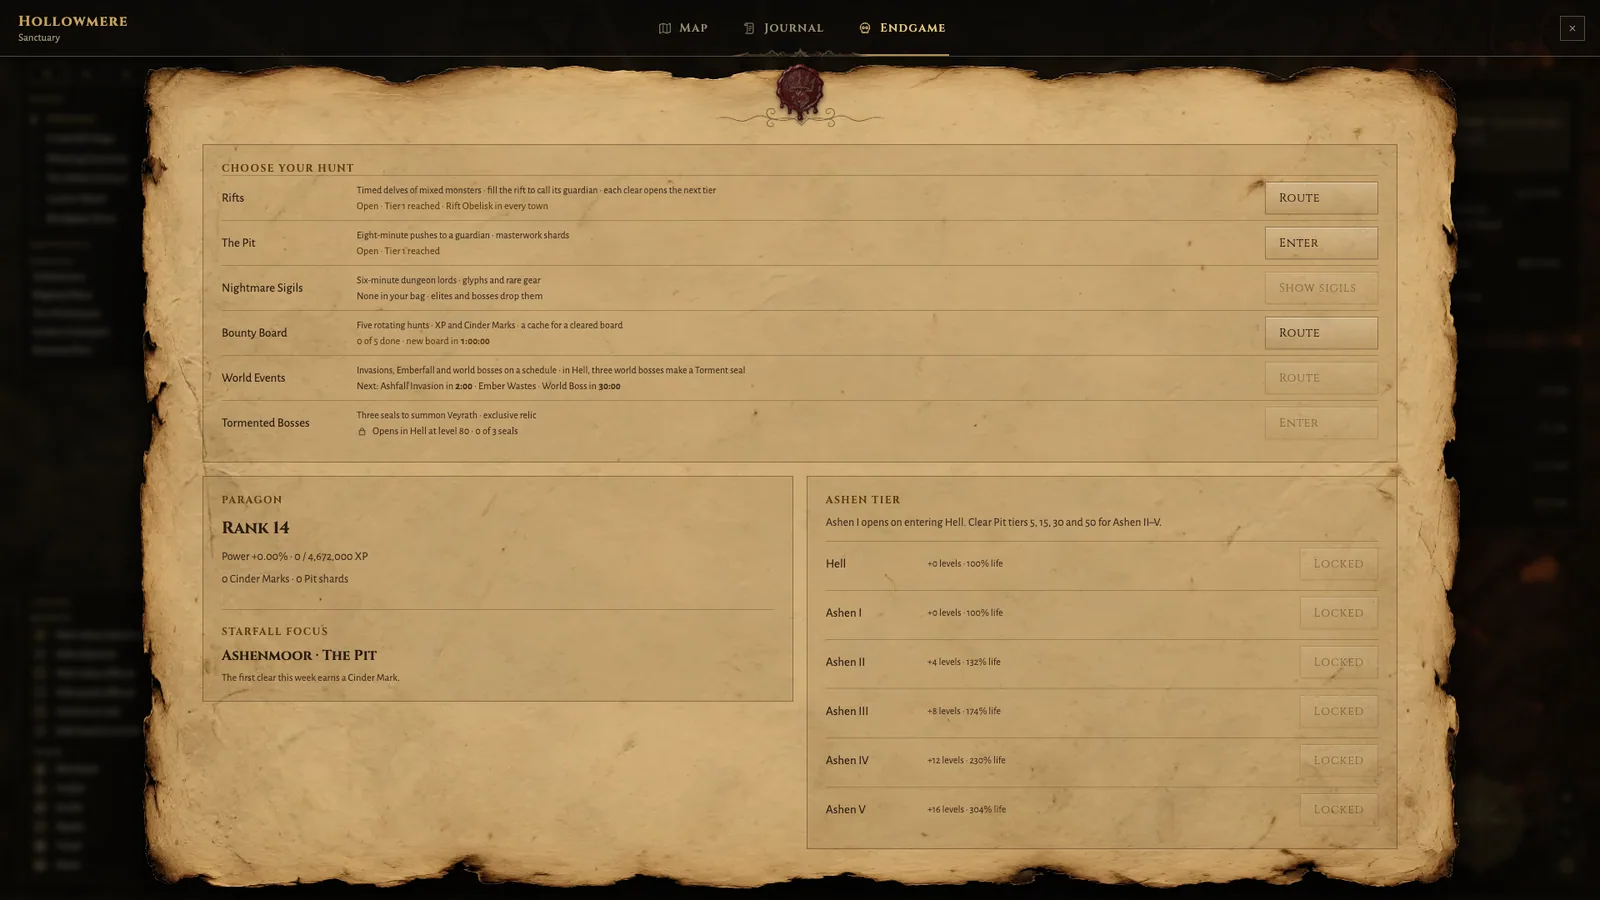
In the gamethe map screen’s Endgame tab
Difficulties and Ashen Tiers
Beating the final boss of Normal opens Nightmare, and Nightmare opens Hell: stronger monsters, lower resistances and better loot. In Hell, Ashen Tiers I to V raise the world further. Tier I opens on entering Hell; II to V open after clearing Pit tiers 5, 15, 30 and 50. Change difficulty and tier at Jorund Vale.
Paragon
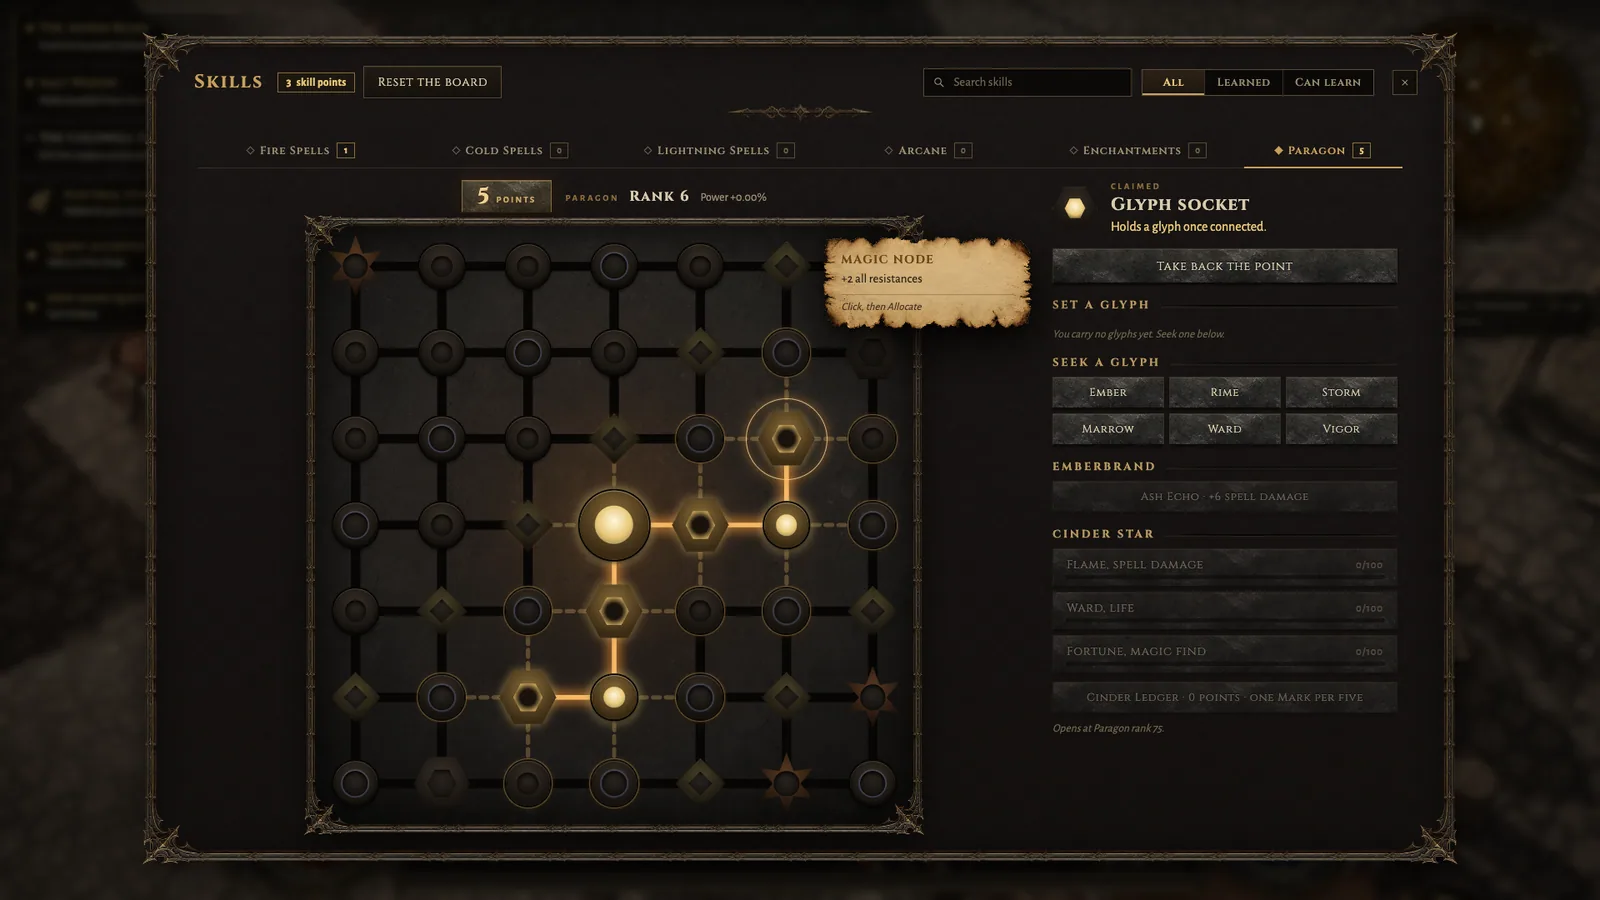
From level 60 you earn Paragon points. Spend them on the Paragon board (P), a grid you claim outward from its centre, with glyph sockets, a class Emberbrand and the Cinder Star. After level 100, Paragon ranks keep coming with no cap.
Each socket shows its kind: round normal and magic nodes, rare lozenges, legendary stars and hexagonal glyph sockets. Claimed paths burn gold, and the sockets you can reach next glow. Click a socket to read it, then Allocate point; right-click a claimed one to take the point back, or use Reset the board.
The Pit
From level 60, Jorund Vale opens the Pit: an eight minute run to find and kill its guardian. Every clear opens the next tier and pays masterwork shards, which Brannoc the smith spends on Masterwork ranks for your gear.
Sigils, bounties and seals
- Nightmare sigils drop from elites and bosses. Right-click one to bind it, then enter the dungeon it names. Entry starts a six-minute timer: kill its lord in time for a bonus hoard.
- Bounties: Marshal Eddra Voss keeps a board of five tasks per town. Clear all five for her cache.
- Tormented bosses: in Hell, three torment seals summon an act boss at full strength for a guaranteed relic.
World events
Ashfall invasions, Emberfall (falling embers to hold against waves), world bosses, cursed shrines, the gilded hoarder and the Blood Moon run on a schedule; upcoming ones appear as cards under the minimap. Choose your Emberfall reward (flame, ward or fortune) at Jorund Vale.
Starfall Focus
Each week one act and one activity are the Starfall Focus. Your first clear of it that week earns a Cinder Mark, and every third repeat another. Three marks buy a rare item for the slot you choose.
Tips and tricks
Small things that make a big difference.
- Hold Shift to cast without walking, so you never stumble into a pack.
- Frozen enemies shatter when they die: nothing gets up again, and their loot still drops.
- Shrines grant a blessing once; their glow fades when they are spent. Look for them on the moor.
- Hold Alt after a big fight to see every drop at once.
- Turn on Skip gold and plain gear in Options, Gameplay to keep the labels to what matters.
- Lock favourite items with Ctrl-click before you use Sell junk.
- Sell or stash in town, then use the town portal to go straight back to the fight.
- Your right skill is best for a big, costly spell; keep a cheap one on the left mouse button.
- Bosses show a card as they arrive. Keep Space ready for their first big attack.
- Stuck on a quest? The tracker’s next step and the star on the minimap always point the way, and F walks you there.
In the gameOptions › Gameplay › Skip gold and plain gear
Troubleshooting and performance
Smoother play, sound, and what to do when something goes wrong.
Smoother play
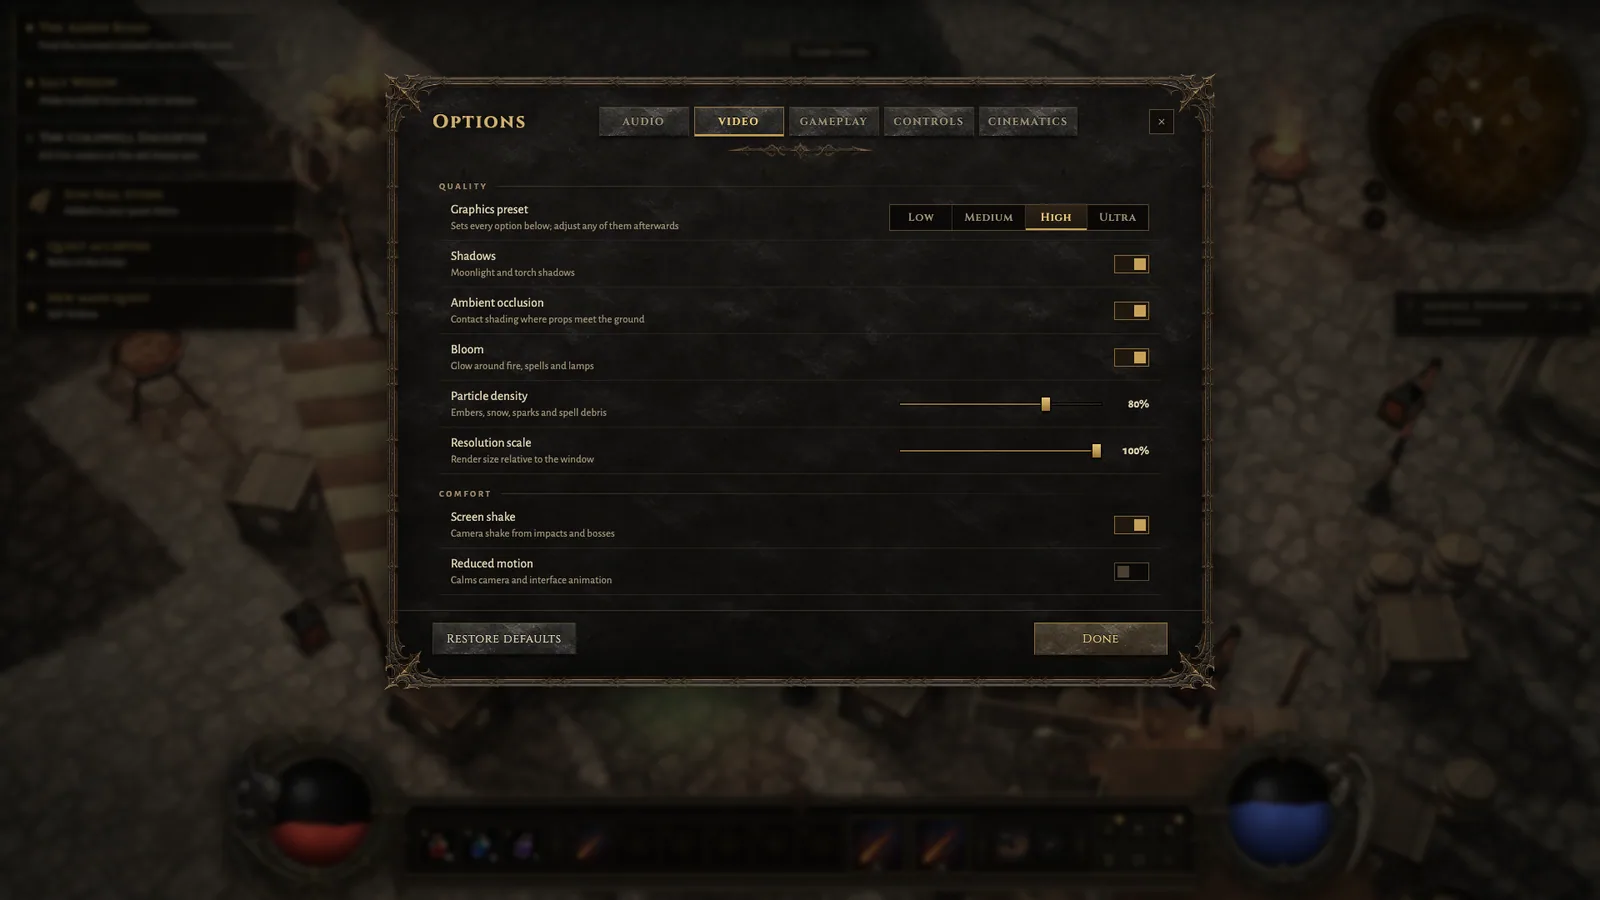
- Open Options, Video and set the Graphics preset to Medium, or Low on older laptops.
- Lower Resolution scale a step or two: it is the biggest win on large screens.
- Turn off Shadows and Ambient occlusion if fights still stutter.
- Play in an up-to-date Chrome, Edge or Firefox with hardware acceleration switched on in the browser’s settings.
In the gameOptions › Video › Graphics preset
Comfort
Text size (Options, Gameplay: Normal, Large or Larger) enlarges text throughout menus, panels and the HUD. Colour-blind colours (Options, Gameplay) keeps item rarities and status colours distinct. Screen shake and Reduced motion (Options, Video) calm the camera and the interface. Subtitles (Options, Audio) caption every spoken line.
In the gameOptions › Gameplay › Text size
In the gameOptions › Video › Reduced motion
Phones and tablets
Ashenmoor is made for desktop. There are no touch controls yet: on a phone or tablet, connect a controller or a mouse and keyboard to play (the prompts follow whichever you use). It asks a lot of your graphics hardware, so expect a desktop or laptop with a dedicated graphics card to run it best.
Sound
No sound? Browsers wait for a click before they play audio: click once in the game. Check Mute all audio and the volume sliders in Options, Audio.
In the gameOptions › Audio › Mute all audio
When something goes wrong
- Reload the page. Single-player progress saves every 30 seconds, on reaching town and at every waypoint; online progress is saved by the server.
- To stop playing, choose Save and quit in the game menu (Esc) in single player, or Leave the Realm or Leave game online: your hero is saved first.
- If the game says a new version is available, Refresh when it suits you.
- A Server update notice counts down before the servers restart: finish your fight and head to town before it reaches zero. The game saves as you play, and you reconnect once the update is done.
- Offline characters live in this browser: clearing site data deletes them. Online characters are safe on the server.
- Still stuck? Tell us: see Alpha notes and feedback.
Alpha notes and feedback
What “open alpha” means, and how to reach us.
Ashenmoor is in open alpha: free to play, still growing, and updated often, sometimes while you play. As the title screen says: “Open Alpha: expect bugs and possible wipes. Type /feedback anytime.”
When an update is coming online, a Server update notice counts down at the top of the screen: finish up and head to town. Updating, back shortly shows while the servers restart, and you reconnect once they are back. Online progress is saved by the server as you play.
- Expect rough edges: balance changes, new areas and the odd bug.
- We try hard to keep characters, but during the alpha a reset may be needed. We will say so ahead of time.
- The version you are playing is shown on the title screen and in the game menu. Please include it when you report something.
Send feedback
- In the game: type
/feedbackand your message in chat (press Enter first; it works in single player and in the lobby too). Your note and a screenshot of your screen go straight to Keven (@keven_ink on X), with your character, place and version. - Or use Send feedback on the title screen, in the lobby or in the game menu (Esc).
- A few reports every ten minutes is plenty: after that the game asks you to wait a little.
- By email: support@playashenmoor.com. Screenshots help a lot.
Nothing matches. Try a shorter word, such as “stash” or “portal”.